Are you curious about how your website is performing? Then Google Analytics is an indispensable tool. With Google Analytics, you can collect data from your website's visitors for subsequent analysis. With the help of this analysis, you can use the right marketing campaigns or adjustments to your website to improve the results by serving your visitors even better. When you want to use Google Analytics, it is of course important that the settings are configured correctly. In this article we will explain to you the basics of how best to do this.
Google analytics profile settings
We start by completing all profile settings correctly. To do this, we go to "Manage > Data Display Settings." Here you fill in the name, URL, time zone and the correct currency. When everything is filled in correctly press "save" at the bottom of this page.
Place the tracking code on your website
Now that the account is created, we need to put a piece of code in the website. This is to ensure that Google Analytics can extract the necessary data from your website. We can find this code in the following location: Go to the property column and click on "Trackinginfo > Tracking code". This code needs to be placed in the backend of your website, you can do this yourself or have it done by your website developer.
Exclude your own IP address
The account is now active, so of course we want to start collecting the most accurate data possible. It is therefore very important that you exclude your own IP address in Google Analytics. After all, many website owners regularly visit his/her site themselves and you only want to measure the visits of external visitors. To exclude yourself, click on "All Filters" in the "Account" column. Here click on add and give this filter a name e.g. "IP filter office". Under filter type select "Predefined" then choose "Exclude > traffic from the IP addresses > that are equal to" and enter your IP address underneath.
Disable bots and spiders
Bots and spiders are programs that automatically visit websites all day long. Of course, you only want to have visitors in your data who are actually website visitors. To prevent these "visitors" from entering your data, you can exclude them. In the view for which you want to do this, go to Manage -> Data View Settings and check 'Exclude all hits from known bots and spiders' at the bottom.
Enable custom notifications
In Google Analytics, you have the option to have automatic notifications sent to you via email when certain changes are visible. This allows you to be immediately aware of sudden drops or increases in traffic and to take quick action if needed. To enable these notifications, go to Manage -> Custom notifications -> Add custom notification.
Set your goals
By setting goals, you can measure conversions on your website. It is important to set goals properly because this is how you measure the final result of your website. Depending on the goal of your website, you determine which goals you set. For example, consider a purchase, adding a product to your shopping cart, signing up for the newsletter, etc. In Google Analytics, there are four types of goal settings:
- Destination (when someone visits a particular page on the website)
- Duration (when someone spends X number of minutes on your website)
- Pages per session (the number of pages viewed per session)
- Event (when you want someone to perform a certain action on your website, e.g. a phone call or filling out a contact form)
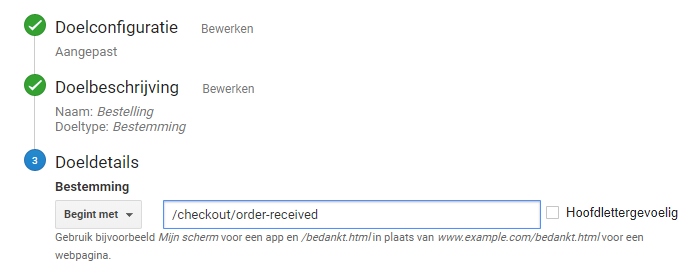
As an example, we are going to set a purchase as a goal. To do this, we need the URL of the thank you page (this is the URL where the customer lands when they complete the purchase. Go to Manage > Goals > New goal. If you want to set a conversion as a goal, click Custom. Then give the goal a name (Conversion) and choose the goal type 'Destination'. In step 3, enter the URL of the thank you page.
